The Best OBS Setting for Recording 2025 [Step-by-Step Guide]
When it comes to recording high-quality content using OBS (Open Broadcaster Software), finding the best settings can make a significant difference in the final output. Whether a seasoned professional or a beginner, this article will help you to find the best OBS settings for recording high-quality videos.
So, let's dive in and learn about OBS high-quality recording settings in the following parts.
Part 1: Best OBS Setting for Recording
This table is a first look at what we shall discuss in the subsequent parts. You will have an easier understanding of the best recording format for OBS through below:
Best OBS Output Setting for Recording:
- Type: Standard
- Recording Path: Select the folder on your computer where you'd like to save the recording file
- Video Format: MP4 or preferred compatible format
- Video Encoder: x264 or Hardware Encoder (e.g., NVENC or VCE)
- Rate Control: CBR
- Bitrate: 10,000kpbs. High bitrate for better quality, balanced with file size and bandwidth
- Keyframe Interval: 2
- CPU Usage Preset: Faster
Best OBS Audio Setting for Recording:
- Audio Bitrate: 128
- Sample Rate: 48 kHz
- Channels: Stereo
Best OBS Video Setting for Recording:
- Base (Canvas) Resolution: 1920×1080
- Output (Scaled) Resolution: 1920×1080
- Downscale Filter: Lanczos (Sharpened scaling, 36 samples)
- Common FPS Values: 60
In the following sections, we will provide a step-by-step detailed guide on configuring OBS's best settings for recording.
Bonus: Best Camera for Recording - OBSBOT Tail Air
OBSBOT Tail Air stands as a revolutionary device in the realm of live streaming and content creation, offering a suite of cutting-edge features that redefine the recording experience. Notably, its recording function sets a new standard for precision and ease.
- AI-Driven Recording Excellence: The camera's AI tracking functionality enables automatic subject tracking, guaranteeing a consistently centered and perfectly framed recording without the need for manual adjustments.
-
Unmatched 4K UHD Resolution: OBSBOT Tail Air boasts an impressive 4K Ultra High Definition (UHD) resolution. This high-quality recording capability translates to crystal-clear visuals, capturing every nuance with unparalleled clarity.
-
User-Friendly and Portable Design: OBSBOT Tail Air maintains a user-friendly interface and a compact, portable design. This ensures that users can effortlessly navigate through recording options and bring the camera wherever creativity strikes.
- Iconic Low Light Shooting: OBSBOT Tail Air captures exceptional low-light video with less noise thanks to its 2μm large pixel size and ƒ1.8 aperture.
Part 2: Understand Each Parameter Before Setting
These parameters listed below play a significant role in tailoring the best settings for recording OBS and achieving the desired video and audio quality. Experiment with these settings and find the right balance so that content stands out and resonates with your audience.
If you already know these parameters, please skip to Part 3 to learn how to set the best obs setting for recording.
1. Resolution
A higher resolution, such as 1080p (1920x1080) or 4K (3840x2160) creates a crisper and lifelike image for content with intricate visuals or text. However, higher resolutions demand more processing power and storage space, so consider the capabilities of your recording device and the intended viewing platform before selecting the resolution.
2. FPS (Frames Per Second)
A higher FPS, such as 60 FPS, ensures smoother and more fluid motion, making it essential for content that involves fast-paced action or precise movements, like gaming or sports recordings. In contrast, a lower FPS, such as 30 FPS, may suffice for standard videos, but it can result in choppier playback, especially for dynamic content. The choice of FPS should align with the nature of your content and the desired viewing experience.
3. Video Encoder
Software encoders like x264 offer a good trade-off between quality and compression and thus are suitable for various scenarios. On the other hand, hardware encoders, such as NVIDIA NVENC and AMD VCE, leverage your graphics card to offload the encoding process from your CPU for faster and more efficient encoding.
4. Bitrate
A higher obs recording bitrate leads to a higher quality video with less compression and better detail preservation. However, higher bitrates result in larger file sizes, which may be a problem for streaming with limited bandwidth or storage capacity. Lower bitrates are suitable for web streaming but may sacrifice some visual fidelity. Pick the right balance between quality and file size so your video looks great while being manageable for storage and streaming.
5. Video Format and Color
Common formats, including MP4, AVI, MOV, and FLV. MP4 offers excellent compatibility and compression. On the other hand, formats like FLV might be better for specific platforms or older systems. The choice of video format influences how easily your video can be shared, edited, and played across various devices and software.
You can choose between "Partial" (16-235) or "Full" (0-255) color range for your video. The full-color range captures a broader spectrum of colors with more vibrant and accurate visuals. A partial color range is helpful in broadcast and streaming for compatibility with various devices and platforms.
6. Audio Settings and Noise Suppression
Audio settings in OBS control the quality and format of the audio captured during your recordings or live streams. Adjust parameters such as sample rate (e.g., 44.1 kHz), audio channels (e.g., stereo or mono), and audio bitrate (e.g., 128 kbps) to ensure your audio sounds clear and professional.
Enable audio noise suppression to improve the audio quality of your content, particularly in environments with ambient noise for more precise and professional-sounding audio.
Additional Parameters Include:
1. Keyframe Interval
The GOP (Group of Pictures) size determines how often a full frame gets transmitted in the video stream. Smaller intervals (lower values) result in more frequent keyframes, providing better seeking accuracy and video quality, but they also increase file sizes. Larger intervals (higher values) reduce file size but can negatively impact seeking accuracy, especially when fast-forwarding or rewinding in videos.
2. Scene Buffering Time
Scene buffering time ensures smooth transitions during your recordings or live streams. Adjusting the scene buffering time prevents abrupt changes and provides your audience with a more seamless viewing experience.
3. Video Filters and Overlays
OBS offers various video filters, such as color correction, chroma key (green screen), and image masking. These filters provide creative control over the visual appearance of your content, allowing you to achieve specific visual effects and improvements. The video overlays and sources, such as images, text, webcams, or browser windows, help to create engaging and professional-looking visuals that add depth and information to your recordings or live streams.
4. Hotkeys and Advanced Output Settings
You can assign hotkeys to start/stop recording, switch scenes, mute/unmute audio, and more. Efficiently using hotkeys can streamline your workflow and ensure a seamless recording experience. OBS provides advanced output settings, like CPU usage presets, profile levels, and buffer size. Adjusting these parameters optimizes performance and video quality based on your system's capabilities and the demands of your content.
Part 3: How to Set the Best OBS Settings for Recording
Now it is time for a step-by-step guide to configuring the best OBS settings for recording 1080p 60fps. Let us look at the output, video, audio, and advanced settings one by one.
1. Output Settings
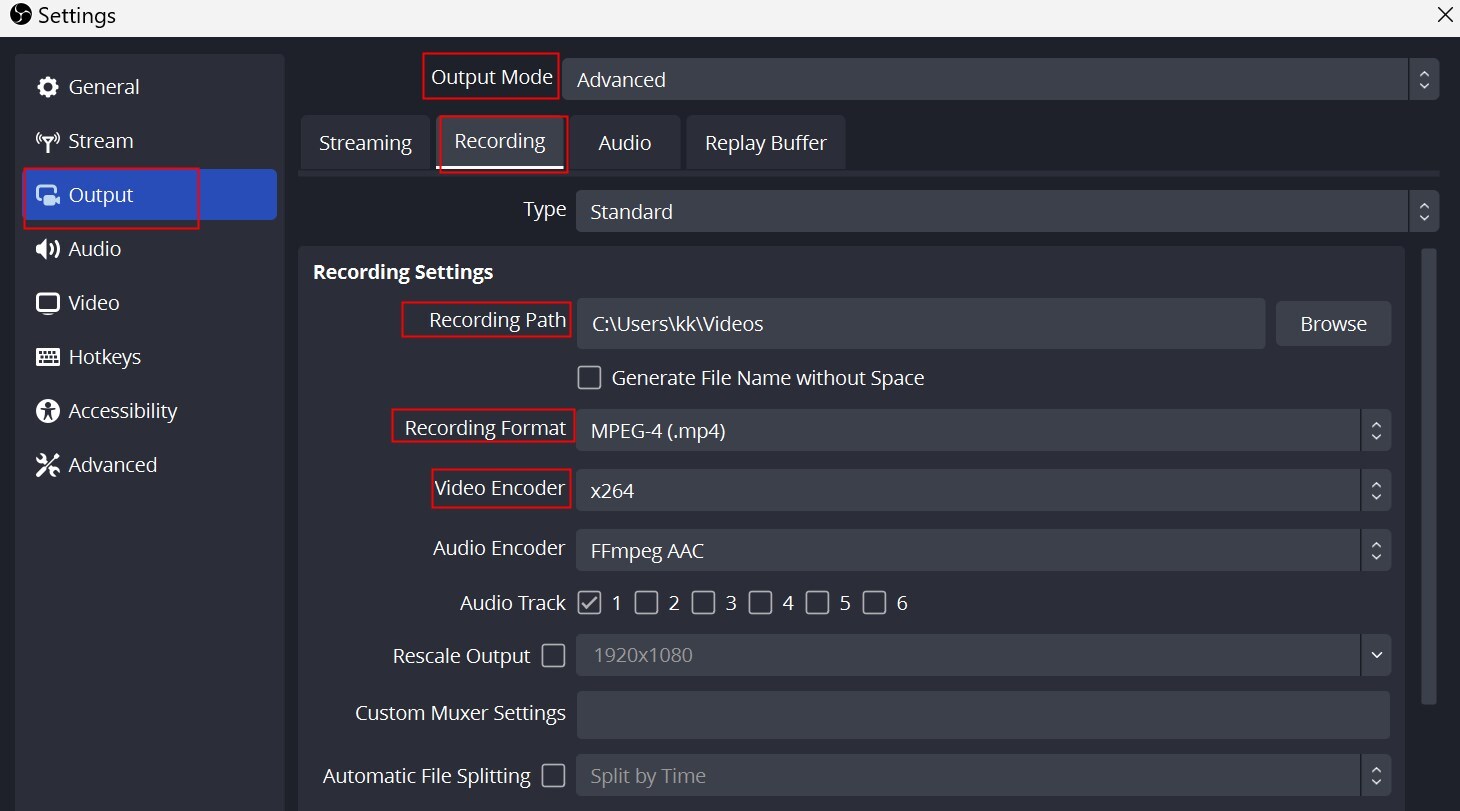
- Visit "File" at the top left corner of OBS and select "Settings." Then in the Settings window, navigate to the "Output" tab.
- Select "Advanced" from the Output Mode drop-down menu and choose the desired recording format in the Recording Format section. MP4 is the most common choice.
- Set the Recording Path to specify where you want to save recorded videos.
- Select X64 as the Video Encoder, and Bitrate set to at least 8000kpbs for 1080p resolution.
- Set the Keyframe Interval to a value between 2 and 4 for most scenarios. Lower values may improve video quality but increase file size.
- Set the CPU Usage Preset to Faster.
- Change to the Audio setting, and make changes to the Audio Bitrate based on your requirements. Higher bitrates (e.g., 128 kbps) offer better audio quality but result in larger file sizes.

2. Video Settings
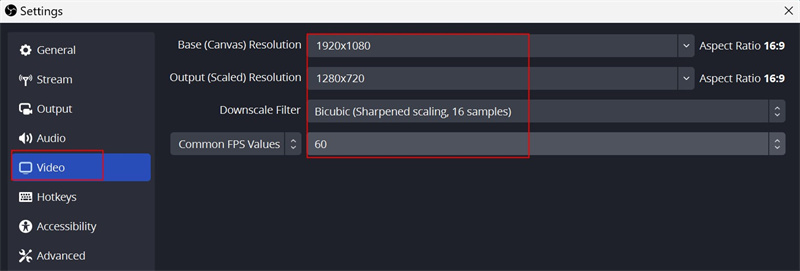
- Navigate to the "Video" tab within the Settings window and set your Base (Canvas) Resolution to match your monitor's native resolution or the desired recording resolution.
- Adjust the Output (Scaled) Resolution based on your target platform and audience. Use 1080p (1920x1080) for high-quality recordings if your hardware supports it.
- Set the Common FPS Values to match the desired frames per second for your recording. Generally, 60 FPS provides smooth and fluid motion, while 30 FPS is sufficient for standard videos.
- Choose the desired Downscale Filter. Bicubic or Lanczos offer better downscaling quality but require more processing power.
3. Audio Settings
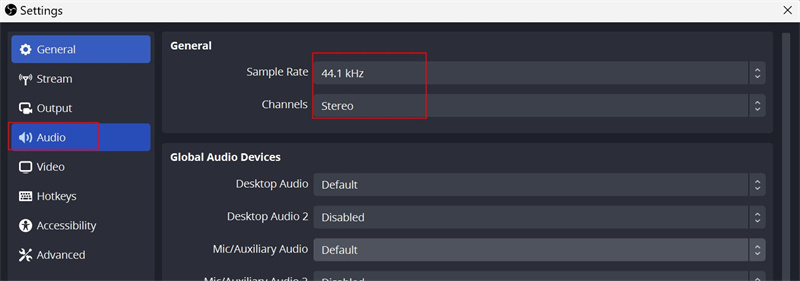
Press the "Audio" tab in the Settings window.
- Set the desired Sample Rate (e.g., 44.1 kHz or 48 kHz) for your audio recordings.
- Select the appropriate Channels setting. Stereo is recommended for most recordings, while Mono is suitable if you need smaller file sizes.
Finally, after configuring the desired OBS Studio best recording settings, click "Apply" to save your changes and "OK" to close the Settings window.
With these optimized, high-quality OBS recording settings, you can start recording high-quality videos that meet your needs. Always balance video quality, file size, and system performance to ensure a seamless and professional recording experience. Happy recording!
Part 4: Useful Tips for Getting the Best OBS Recording Settings
1. Balancing Quality and Performance
- Testing Different Settings: Try different setups when you record to find what gives you the best quality without slowing down your computer.
- Resource Monitoring: Keep an eye on how much your computer's CPU, GPU, and memory are being used during recordings using special tools. This helps make sure everything works smoothly.
2. Improving Audio Clarity
- Sound Quality Settings: Change your audio settings to make sure your recordings sound clear. Use higher numbers for sample rates (like 44.1kHz or 48kHz) and bitrates (like 128kbps or more) for better sound quality.
3. Updating Software and Drivers
- Keeping OBS Up to Date: Always use the newest version of OBS Studio. This way, you get all the new features and fixes for any problems.
- Updating GPU Drivers: Make sure your computer's graphics card (GPU) drivers are up-to-date, especially if you use hardware encoders. This helps everything run better.
4. Reviewing Test Recordings
- Reviewing Test Recordings: Watch your test recordings carefully to check how good the sound and video are.
- Making Small Changes: Use what you learn from these recordings to adjust your settings little by little until you get the best results.
Part 5: FAQs about Best OBS Setting for Recording
1. What Bitrate Should I Record at OBS for High Quality?
The bitrate you should use to record at OBS for high quality will depend on factors such as your internet connection, hardware capabilities, and desired output quality. Generally, a bitrate between 10,000-20,000 kbps (kilobits per second) is recommended for high-quality recordings. Experiment with different bitrates to find the balance between quality and file size that suits your needs.
2. How Do I Record My PS4 with OBS?
To record your PS4 gameplay with OBS, you'll need to set up a capture card. Connect your PS4 to the capture card, then connect the capture card to your computer using an HDMI cable. In OBS, create a new scene and add a new video capture device source. Select your capture card from the list, and you should see your PS4 gameplay appear in the preview window. Adjust the necessary settings according to part 3.
3. What's the Best OBS Settings for Recording Gameplay?
The best OBS settings for recording gameplay can vary depending on your specific setup and preferences. However, here are some general recommendations:
- Video settings: Set the base canvas resolution and output scaled resolution to match your desired recording resolution. Use the H.264 encoder for recording. Choose a suitable bitrate, as mentioned in the first question, and experiment with the preset options ranging from "ultrafast" to "slow" to find the right balance between quality and performance.
- Audio settings: Set your desired audio bitrate, sample rate, and channel configuration. Ensure that you have selected the correct audio sources for your gameplay audio and microphone input.
- Other settings: Consider enabling hardware acceleration if your system supports it, as it can improve performance. Additionally, adjust the recording format (e.g., MP4 or FLV) and the location to save your recorded gameplay files.
Remember to test and adjust these settings based on your specific hardware and requirements to achieve the best results for recording gameplay with OBS.
Conclusion
Thus, that was all the information we could gather about the best recording format OBS. We shared a detailed table summarizing the settings you need for optimal recording and live streaming at the start of the article. Besides, we explained each parameter for OBS setting and their importance for high-quality OBS recording settings.
