Mastering Obsbot Live with the OBSBOT Tail Air Smart Remote Controller
Welcome to the guide on using your OBSBOT Tail Air Smart Remote Controller on Obsbot Live. Whether you're setting up for the first time or looking to improve your live streaming experience on Obsbot Live, this guide has got you covered! Let's get started!
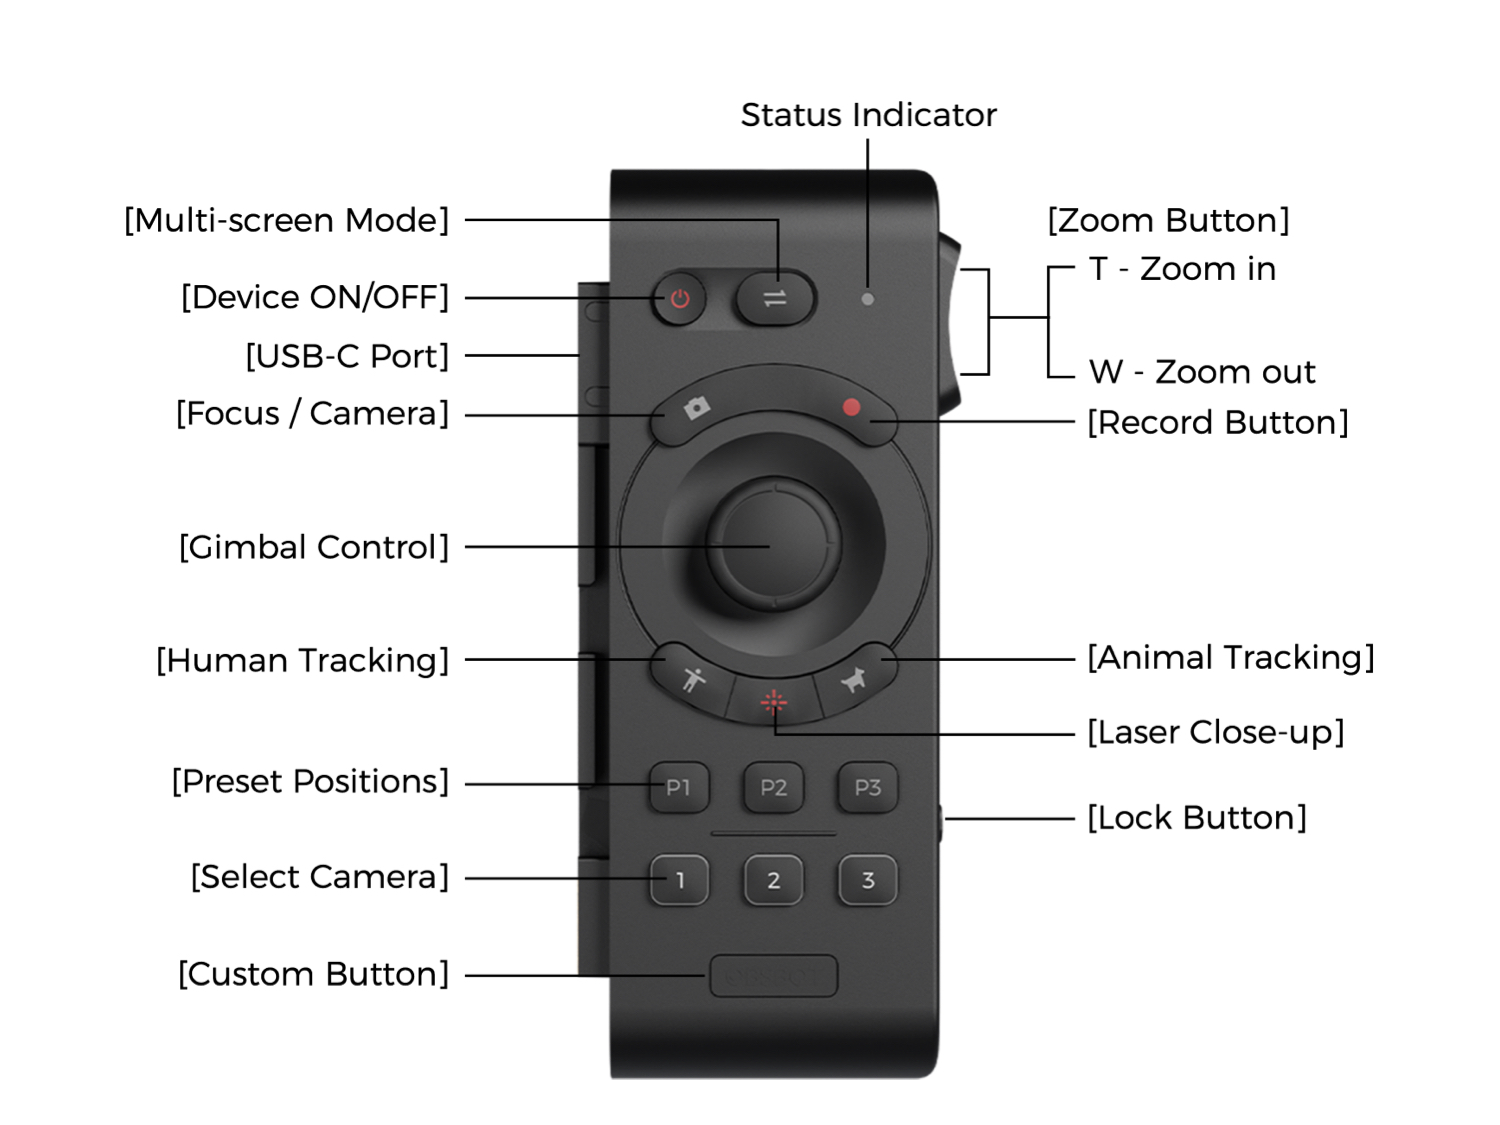
Button Introductions
Understanding the functions of the buttons on your Obsbot Live remote control is crucial for effectively managing your live streams. Get to know each button of OBSBOT Tail Air Smart Remote Controller first!
First Connection with Obsbot Live
- Before you start, make sure your Tail Air Smart Remote Controller is updated to the latest firmware version.
- After updating, long press the【Human Tracking】button for 3 seconds. The indicator light of the remote controller will change from always on to continuously flashing and enter Bluetooth Pairing Mode. After releasing it, the indicator light will continue to flash.
- Click "Connect" in the Obsbot Live app to bring up the Bluetooth connection interface.
- Select the searched remote controller in the Bluetooth list and connect it.
- After the blue light flashes and goes out, it means the pairing is successful and these sources are available for control, and the corresponding source buttons【1】, 【2】, and【3】will be lit white.
- After the connection is successful, the button status in Obsbot Live will change to "Connected".
Notes:
- To update the Smart Remote Controller, download the latest firmware on our website, and pair it in advance with an OBSBOT Tail Air. Follow the firmware update guide to complete the firmware upgrade.
- If pairing fails, the remote controller will exit pairing mode after the red light flashes three times.
- Obsbot Live App will record the information of the remote controller connected each time. If the remote controller has been connected to multiple phones, you need to manually disconnect the remote controller from other phones before you connect it, to avoid the remote controller matching to the other connected phone during the live streams.
Choose a Working Mode
1. PiP Mode
PiP (Picture-in-Picture) Mode allows you to view multiple sources simultaneously in canvases. After you preset the canvases on Obsbot Live before your live streams, you can enable or disable PiP Mode using the OBSBOT Tail Air Smart Remote Controller and switch between them during live streaming.
If you have not opened PiP Mode on Obsbot Live, the remote controller allows you to manage and switch between different camera sources seamlessly.
Detailed Guide Steps to Control the Working Mode with Your Controller
Step 1: Power On the Controller
- Press【Device ON/OFF】button to activate all the buttons on the remote controller, allowing you to use/close all functionalities.
Step 2: Activate/Deactivate PiP Mode
- When you are in a live streaming with PiP canvases preset, tap【Multi-Screen Mode】button to enable or disable PiP Mode (it is disabled by default) by your need.
Note: If canvases are not available in the current live stream, tapping this button will have no effect, and you need to set them up in the Obsbot Live app in advance.
Step 3: Switch Cameras/Canvases
- If you have opened PiP Mode
Double-tap any of the Select Camera Buttons【1】,【2】,【3】to switch to the corresponding PiP source (Canvas 1, Canvas 2, Canvas 3).
State Instructions: When switching PiP sources, there will always be one screen remaining in PGM mode. For example, if Canvas 1 is active (red light), single-tapping Canvas 2 or Canvas 3 to make them active (red light) will turn Canvas 1's light yellow.
- If you have not opened the PiP Mode
Double-tap any of the Select Camera Buttons【1】,【2】,【3】to switch to the corresponding source. The button will turn red to indicate that it is now an active device. The buttons for unchosen cameras will remain white.
Single-tap any of the Select Camera Buttons【1】,【2】,【3】to switch to single control mode. The button will turn green to indicate that it is in single control mode.
State Instructions: When switching between sources, there will be one screen that is always in PGM mode. For instance, if 【1】is active (red light), only after double-tapping【2】or【3】to make them active (red light) will【1】's light change to white.
2. Single Control Mode
When in Tail Air's Single Control Mode, pressing the【Focus/Camera】button will take a photo of the current camera view and save it to the SD card. If no Single Control Mode is active, pressing this button will not take a photo.
When in Tail Air's Single Control Mode, pressing the【Record】button will start recording the current camera view to the SD card. If no Single Control Mode is active, pressing the record button will not give a response.
Click to learn more about Tail Air's Single Control Mode on OBSBOT Tail Air Smart Remote Controller first use guide.
Take your live streaming experience to the next level with your OBSBOT Tail Air Smart Remote Controller. Apply the steps from this guide to create engaging and professional live streams.


